Content Hub Ops provides a robust search interface allowing users to quickly find content items. Users can use free text search or narrow results using filters.
Access Search
To access the Search page:
- Click Content on the navigation bar.
- Click Search in the drop-down menu.
Search Bar
Located at the top of the search results grid, the Search bar allows full-text search across all content and all metadata fields to return results.
To use:
- Navigate to the Content/Search page from the navigation bar.
- Click into the Search bar.
- Enter a keyword or phrase (e.g., “campus sustainability”).
- Hit Enter. A list of matching results will appear.
- Click a result to open the item.
Filters Panel
For more targeted searches, use the filters in left-side panel. These allow filtering by content metadata and taxonomies.
To use:
- Use the filters on the left-hand panel to refine your search:
- Content Sub-Type (e.g., News Release, Campus Story, Podcast)
- Content Template (e.g., Standard Story, Photo Gallery Story, Brief Story)
- Life Cycle Status (shown on the right side of the Search bar as a drop-down box)
- Organizational Entities
- Topics
- Strategy
- Audience
- College
- Career Interest Area
- Combine multiple filters for precise results.
- Click the title of the desired content item in the search results to open it.
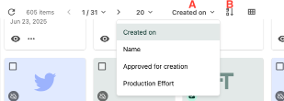
Sort and Viewing Options
Users can select the sorting filter to change the sorting of the results, such as by Date created or Name. Reverse the sorting by clicking the Sort button to the right of the sorting option.
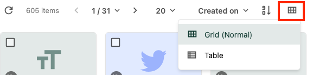
Toggle between Grid and Table views to display search results in a grid or a table view. Click on the icon next to the sort options to change the view.
Bulk Actions (Admins Only)
Content Admins can manage items in bulk through the mass edit in table action, can export a selection of content items in Excel, and, in the future will be able to add items to Campaigns or Content Tags.
To use:
- From the Search page, select a few or select all items by clicking the checkboxes on item cards or dragging content items from the search results.
- On the top bar at the right side, additional actions will appear:
- Click the pencil with a grid icon (“Edit in table”) to edit items in bulk. The following fields can be viewed and edited from the mass edit table: Name, Content Sub-Type, Content Template, Reviewer, Publication Date, Primary Topic, Secondary Topic, Tertiary Topic, Primary Strategy, Secondary Strategy, Primary Audience, Secondary Audience, Career Interest Area, Campaigns, College, Organizational Entities, Production Effort, Status and Active States.
- Click the megaphone icon (“Add to Campaign”) to add items to an existing campaign or create a new campaign with the selected items. (Future use case)
- Click the tag icon (“Add to a Content Tags”) to add content tags to the selected items. Content tags are used primarily for reporting purposes. (Future use case)
- Click the three dots icon (“Actions”) to open a menu to show additional actions, including Export to Excel and bulk Delete.
Tip: If exporting to Excel (for reporting purposes), give the download file a name, select “User-friendly cell values” and leave “User-friendly column values” unselected for more consistent formatting in the Excel report.
Documentation updated: June 19, 2025
Is there an issue with this documentation? Report it here.
Tip: Use quotation marks around a phrase to require an exact match.