University Communications and Marketing uses a visibility restriction function to limit access of specific assets to specified functional groups. See "Restricting Asset Visibility" for more information on this workflow. This workflow requires the establishment of functional user groups. Functional user groups can be created by admins.
Creating Asset Visibility Functional Groups
There are four general steps needed to establish functional groups for controlled visibility. The instructions for creating these groups are below.
- Log in to Content Hub.
- Click the gear icon to open the Manage page.
- Click the Taxonomy tile.
- Navigate to and click the name MSU.FunctionalGroup in the list of taxonomies.
- Click the “+” icon to add a new functional group to the list.
- Fill in the fields to create the new group:
- Name — The name of the group; no special characters are allowed.
- Label — What will be visible to users.
- Identifier — This will automatically populate based on the name.
- Synonyms — Optional.
- Description — Optional, but it is a best practice to complete this information.
- Click Save.
- Click the gear icon to return to the Manage page.
- Click the Users tile.
- Click the User groups tab on the Users page.
- Click the “+ Usergroup” button to add a user group.
- Fill in the Usergroup properties options, as needed.
- Click Save.
- Click the left arrow icon next to the group name to return to the User groups tab on the Users page.
- Find the user group in the list. Click the gear icon to open the Policies page for the group.
- Click New rule button.
- Check the State (M.Automation.State), State flow (M.Automation.StateMachine) and Transition (M.Automation.Route) options in the list and click OK.
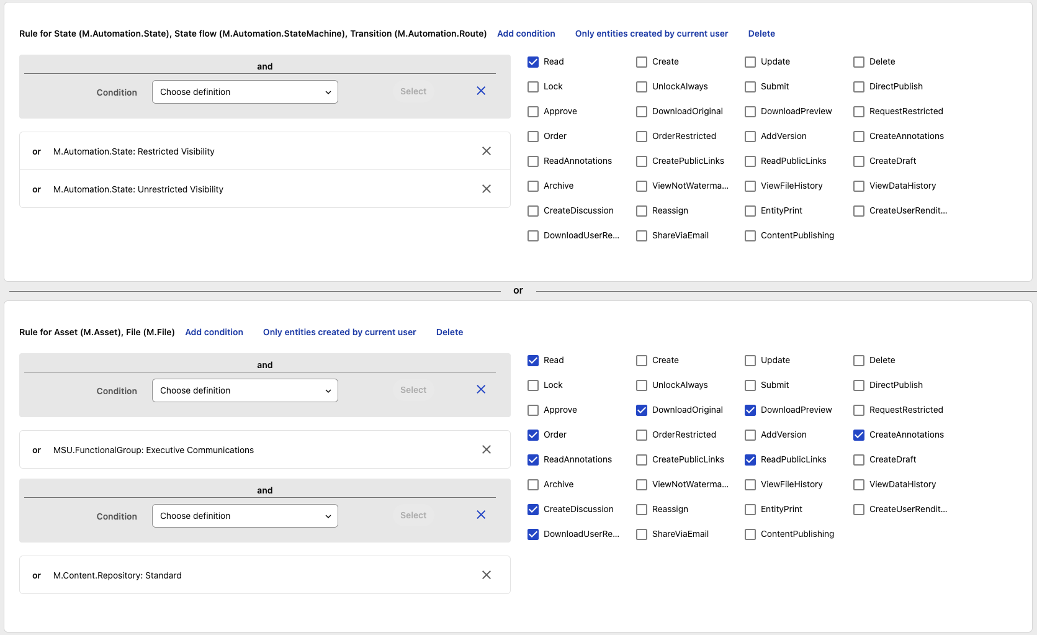
- Assign the following permissions by checking the box next to their label:
- Read
- Click Add condition next to the Rule name.
- In the “Choose definition” drop-down, select State (M.Automation.State) and click Select.
- Check Restricted Visibility and Unrestricted Visibility in the list of options and click Select.
- Click New rule button.
- Check the Asset (M.Asset) and File (M.File) options in the list and click OK.
- Assign the following permissions by checking the box next to their label.
- Read
- Order
- ReadAnnotations
- CreateDiscussion
- DownloadUserRenditions
- DownloadOriginal
- DownloadPreview
- ReadPublicLinks
- CreateAnnotations
- Click Add condition next to the Rule name.
- In the “Choose definition” drop-down, select Content Repository (M.ContentRepository) and click Select.
- Check Standard in the list of options and click Select.
- Click Add condition next to the Rule name.
- In the “Choose definition” drop-down, select Functional Group (MSU.FunctionalGroup) and click Select.
- Check the name of the appropriate functional group and click Select.
- Click Save.
- Click the gear icon to return to the Manage page.
- Click the Users tile.
- Click the User groups tab on the Users page.
- Click the “+ Usergroup” button to add a user group.
- Fill in the Usergroup properties options, as needed.
Note: Make the use of the group clear in the name. Follow the naming convention of “Functional Group – Insert Group Here.” For example, “Functional Group – Executive Communications Validator.”
- Click Save.
- Click the left arrow icon next to the group name to return to the User groups tab on the Users page.
- Find the user group in the list. Click the gear icon to open the Policies page for the group.
- Click New rule button.
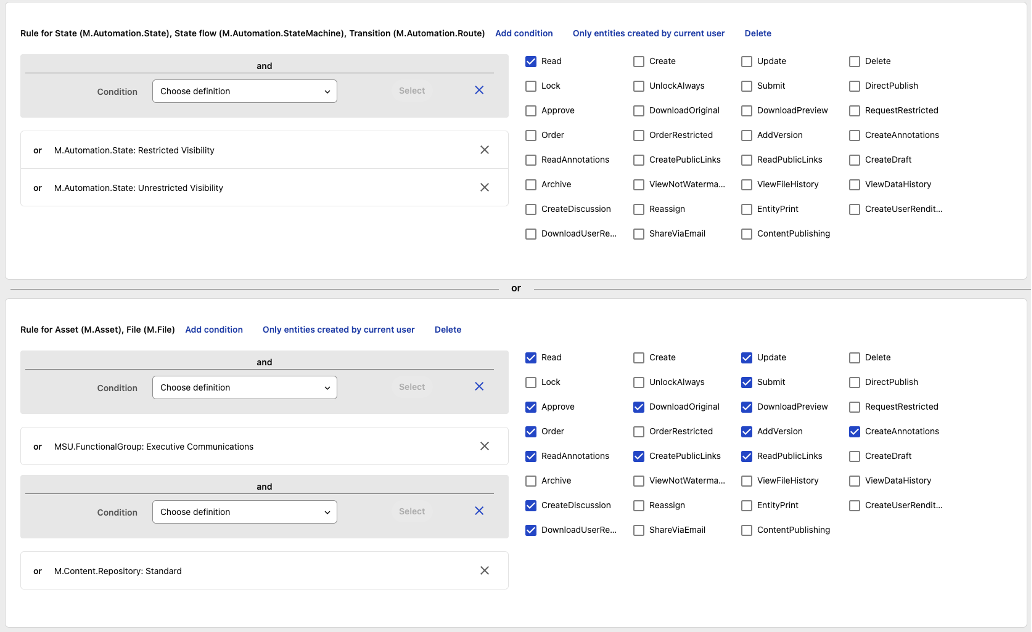
- Check the State (M.Automation.State), State flow (M.Automation.StateMachine) and Transition (M.Automation.Route) options in the list and click OK.
- Assign the following permissions by checking the box next to their label:
- Read
- Click Add condition next to the Rule name.
- In the “Choose definition” drop-down, select State (M.Automation.State) and click Select.
- Check Restricted Visibility and Unrestricted Visibility in the list of options and click Select.
- Click New rule button.
- Check the Asset (M.Asset) and File (M.File) options in the list and click OK.
- Assign the following permissions by checking the box next to their label:
- Read
- Approve
- Order
- ReadAnnotations
- CreateDiscussion
- DownloadUserRenditions
- DownloadOriginal
- CreatePublicLinks
- Update
- Submit
- DownloadPreview
- AddVersion
- ReadPublicLinks
- CreateAnnotations
- Click Add condition next to the Rule name.
- In the “Choose definition” drop-down, select Content Repository (M.ContentRepository) and click Select.
- Check Standard in the list of options and click Select.
- Click Add condition next to the Rule name.
- In the “Choose definition” drop-down, select Functional Group (MSU.FunctionalGroup) and click Select.
- Check the name of the appropriate functional group and click Select.
- Click Save.
Note: This user group should only be assigned to users who also already have the “Asset Validator” user group assigned to their account.
- Click the gear icon to open the Manage page.
- Click the Taxonomy tile.
- Navigate to and click the name MSU.FunctionalGroup in the list of taxonomies.
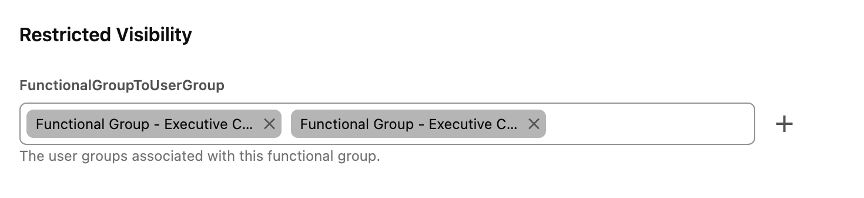
- Click the “i” (information) icon to the right of the group name to open the group details.
- Click the pencil (edit) icon to edit the group details.
- In the “Restricted Visibility” section, click the “+” icon next to the “FunctionalGroupToUserGroup” field.
- Add both the two new user groups to this field.
- Click Save.
Note: Make the use of the group clear in the name. Follow the naming convention of “Functional Group – Insert Group Here.” For example, “Functional Group – Executive Communications.”