Obtaining Access
University staff can request access to Sitecore XP by contacting the University Communications and Marketing platforms group and noting the website they need access to.
Users must complete Sitecore XP training before they will receive access. The website owner will need to approve the access request.
Login
Each user should use their own credentials to log in to Sitecore. This provides the proper audit trail and asset ownership information.
To log in:
- Navigate to a Sitecore environment:
- Production (live) – https://sitecore.msu.edu/sitecore/
Quality assurance (QA, or testing) – https://webcms.qa.sitecore.msu.edu/sitecore/
Note: Do not use the Okta button as it is not functional at this time.
For security reasons, do not check “Remember me.”
- Enter your user name and password.
- User name – usually MSUNetID
- Password – Sitecore-specific password
- Click Log in.
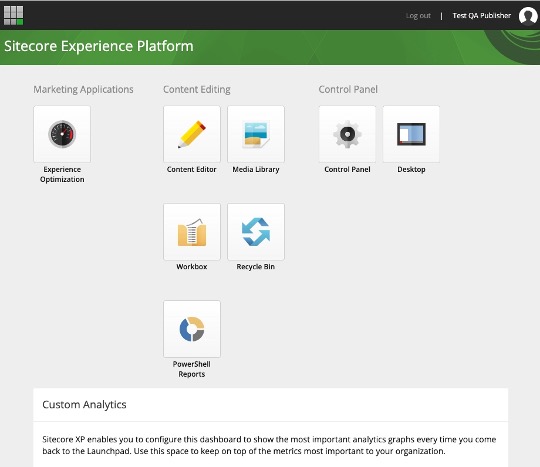
- Upon successful login, Sitecore will display the Launchpad.
- If you do not see the Launchpad, click Launchpad in the upper left.
Launchpad
All Sitecore core activities are initiated from the launchpad, a grid of icons linking to various tools. The tools a user will see may vary depending on the user’s access and permissions.
The title bar of the launchpad will be green in the QA environment and red in the production environment.

Control Panel
The Control Panel enables users to change their password and personal settings. It is also used to scan websites for broken links.
From Launchpad, select Control Panel.
From any other place in Sitecore, click Launchpad icon (grid of nine small squares in the upper left corner) and select Control Panel.
- Under My Settings, select Change password.
- Enter current and new passwords and click Change password.
- After a password change, log out and log back in using a new browser tab to refresh the login session information.
Contact the University Communications and Marketing platforms group and request a password reset.
- Under My Settings, select Change personal information.
- Change full name and email address. Contact the University Communications and Marketing platforms group to change other information.
- Under Reports, select Scan the database for broken links.
- Select the master checkbox on the navigation bar to scan content maintained by content authors.
- Select the web checkbox on the navigation bar to scan the latest version of published content.
- Click Scan. This process may take several minutes.
Content Editing Tools
There are three primary tools used in creating, editing and publishing webpages: Content Editor, Experience Editor and Media Library. Expand the tabs below to learn more about each tool and see the links below for instructions on their use.
Content Editor is used to create pages using predesigned templates. Content is then added into various components.
- Pages and content components are stored in the content tree, where the content author can navigate to a specific item in the hierarchy.
- The hierarchical content tree show the relationships between items.
- Content is entered in data fields. It does not appear in Content Editor how it will appear on the webpage. (Layout is established in Experience Editor, below).
- Pages are viewed with the Preview tool or by publishing the page and viewing it in a browser.
- Content can be locked to prevent multiple content authors from working on an item at the same time.
Experience Editor is a page layout tool. It allows content authors to place content components on a page using a What You See Is What You Get, or WYSIWYG, user interface.
- Content items are presented as they will appear on the website.
- Content can be edited directly on the page.
- Content created in Content Editor is not included on a page until placed on the page using Experience Editor.
- Content can be locked to prevent multiple content authors from working on an item at the same time.
The Media Library is a location to upload and store image and asset files, such as PDFs, for later use in Content Editor and Experience Editor.
- Usable file types include images, videos and PDFs.
- Files are uploaded here to be used in Content Editor and Experience Editor.
Documentation updated: Nov. 1, 2024