What is a Component?
Components are the building blocks for webpages. Components hold content in data fields and then assign predesigned style to the content according to the type of component. Components are created and edited in Content Editor and placed on pages in Experience Editor.
Component Workflow
The general workflow for using components is to:
- Create the page where the component will live.
- Create the new component(s) in Content Editor.*
- Place the component(s) on the page in Experience Editor.
- Add or edit component content in Content Editor. This can be done before or after it is placed on the page.
*Note: A few components are used as layouts or containers that hold other components created in Content Editor. For example, the TwoColumnContainer_66_33 and the Grid Container components are meant to hold other components. These layout components must be created in Experience Editor. Components created in Content Editor can then be placed in the layout components in Experience Editor. Layout components will not appear in the Content Editor’s Content Tree.
Instructions
- Open Content Editor from the Sitecore launchpad.
- In the Content Tree, navigate to the page where the new component will be added.
- Expand the page by clicking the arrow to the left of the page name.
- Expand the Page Components folder to see the components on the page.
- Right-click the Page Components folder to bring up the tool menu.
- Select Insert and choose a component to add from the list. The list may scroll if the window is not large enough to display the full list of available components.
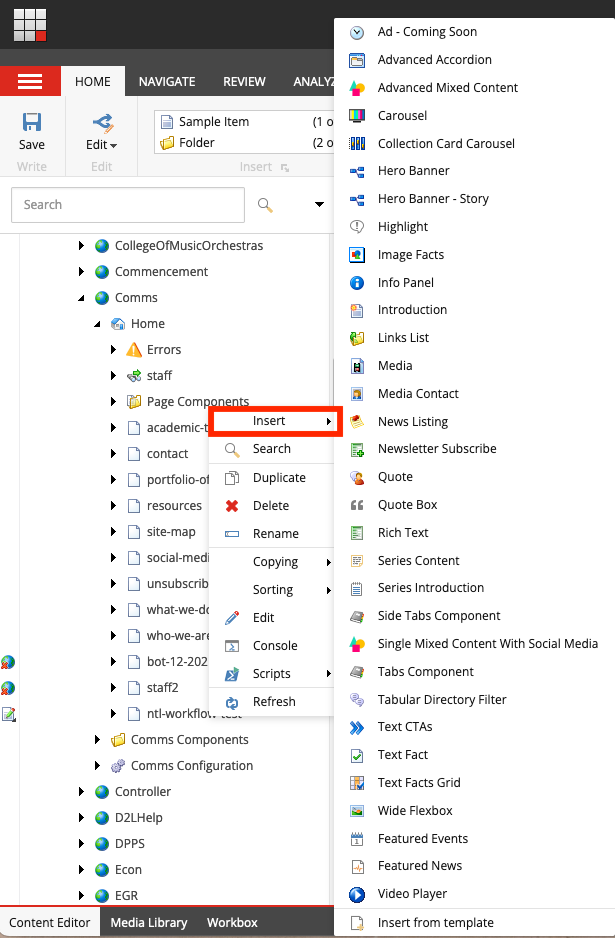
- Give the component a name that is unique within the context of the page. This is an internal identifier used by Sitecore and will not impact the URL. Use the default name or a more meaningful name to help content authors recall what content will be placed in the component. Component names can use a mix of lowercase and uppercase text.
- Click OK.
- Confirm that the added component now displays in the Page Components folder.
- Add content to the new component. Click the component to display the component fields. Add images, text, etc., to the component, as needed. A red vertical bar to the left of a field indicates required content.
- Click Save on the navigation ribbon.
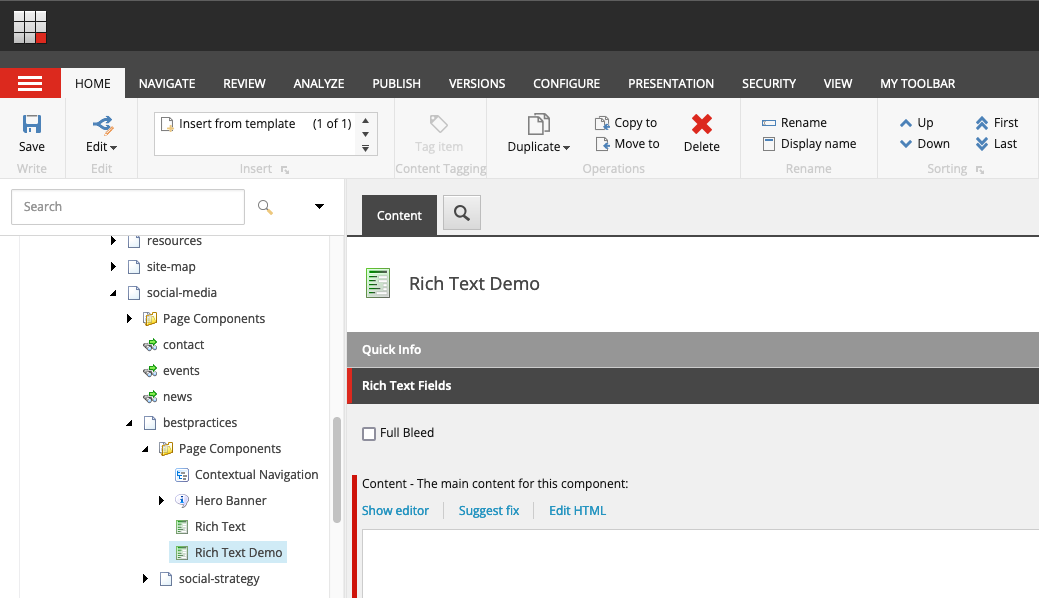
- In Content Editor, navigate to the desired page in the Content Tree.
- Click the page name.
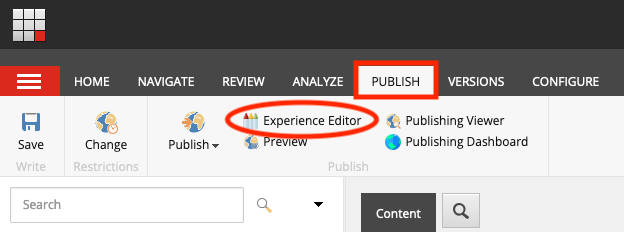
- Select the Publish tab on the navigation ribbon.
- Click Experience Editor. This page will open in a new browser tab.
- Click “Add a new component” icon located on the Experience Editor ribbon to the right of the Search icon. The icon looks like three rectangles connected by lines. This icon is always available in the top ribbon or in the Home tab.
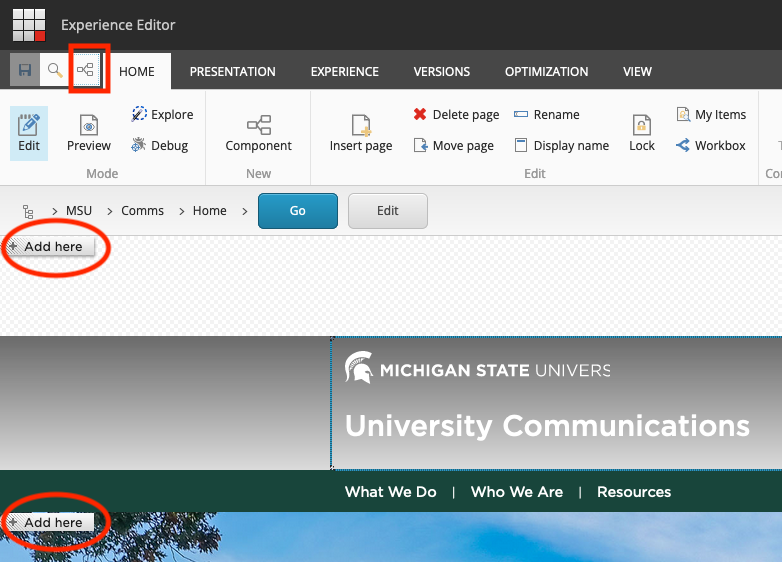
- Click the “+ Add here” button where the new component will be placed.
- Hero banner components are placed above the page breadcrumb links.
- All other components are placed below the page breadcrumb links.
- When placing a new component, only select a “+” button that is left justified (i.e., at the left edge of the screen) and upon mouse hover displays “Add a new rendering to the ‘MainContent’ Placeholder.”
- Choose a component rendering to add to the page. A rendering determines the way that content is displayed on a webpage, including layout and style. Only renderings that are allowed in the identified location will appear in the selection window.
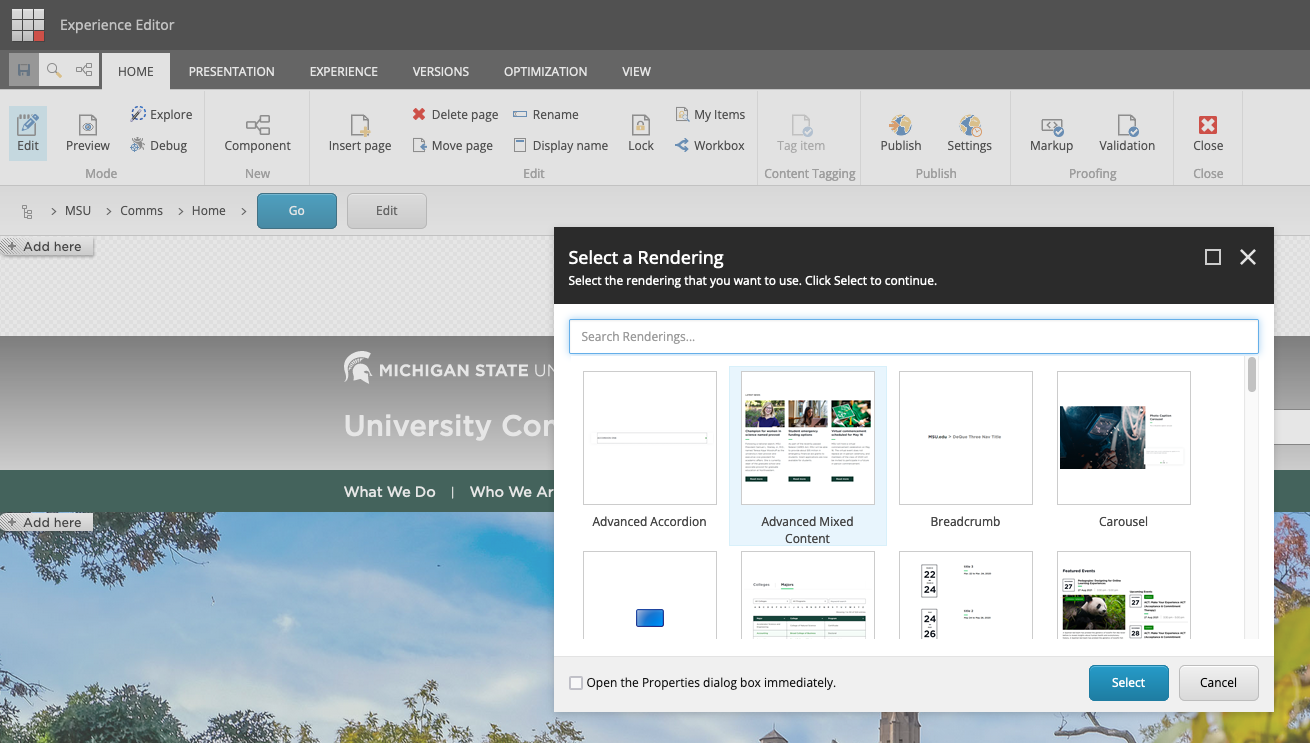
- Click Select.
- Assign associated content.
- For components previously built in the Content Editor, select the component from the list of available page components. The component selected must match the selected rendering type.
- For components not previously set up in Content Editor, select Create New Content, give the component a name unique within the context of the page, and click OK.
- Repeat steps 5-9 as necessary for additional components.
- When all components have been placed on the page, click Save (upper left under the Sitecore launchpad icon.) Warning pop-ups can be ignored. Click OK to close them.
- Close the Experience Editor browser tab and return to Content Editor. The placed components will display in the Page Components folder.
- Scroll to the top of the screen. Wait for the spinning icon to disappear. Once saved, the Save icon will be grayed out.
If both Content Editor and Experience Editor are open in browser tabs or windows, the latest Save is retained. When moving from one to the other, press Refresh (not Save) and Sitecore will pull in saved changes from the other tool.
- Edit previously created components, as needed, and click Save.
- Add content to any components that were added in the Experience Editor using “Create New Content” and click Save.
- To view the new component(s) without publishing the page, refer to the Preview page for instructions.
- When the page is ready to publish, refer to the Publishing page for instructions.
Remove or Delete Components
To Remove a Component From Displaying on a Published Page:
In Content Editor:
- Locate the page in the Content Tree (left pane).
- Click the page to select it.
- On the Publish tab of the navigation ribbon, select Experience Editor. Experience Editor opens in a new browser tab.
In Experience Editor:
- Locate the component to be deleted.
- Click the component to select it. Verify that the toolbar for this component is displayed.
- While selected, click the red X icon to remove the component from the page.
- Click Save (blue diskette icon in upper left).
- Close the Experience Editor tab.
- In Content Editor, select the page in the Content Tree.
- Publish the page to remove the component from the published page.
To Delete a Component:
In Experience Editor:
- Remove the component from the page following the steps outlined above.
In Content Editor:
- Find the page in the Content Tree and expand it.
- Expand the Page Components folder.
- Locate and select the component to be deleted.
- Delete the component using one of two methods:
- Right click the component and choose the red X option in the menu.
- With the component selected in the Content Tree, click the red X button in the home tab of the top main menu.
Documentation updated: June 17, 2024