Save and Publish Process Overview
Content additions and changes save automatically as content authors work in the system. These must be published using the publishing workflow before they will appear on the website.
Note: Users can work on changes to a live page in draft form without impacting the live page. Editing creates a new version of the page; the changes won’t go live until the edits are submitted to the publishing workflow.
Publishing Workflows, Explained
With workflows enabled, content no longer needs to be manually published. When content is approved through workflow it is automatically added to the publishing queue.
This publishing behavior applies to content edited in both Page Builder and Content Editor. While the steps differ slightly depending on where a user is working, the outcome is the same: approved content is queued for publishing and published during the next scheduled publish cycle.
Note: Users can work on changes to a live page in draft form without impacting the live page. Editing creates a new version of the page; the changes won’t go live until the edits are submitted to the publishing workflow.
How Cloud Publishing Works
When the publishing queue runs its regularly scheduled publish cycle, content is saved in the Sitecore Master database. Published items are copied from the Master database (where content is maintained and stored) to the publishing target (i.e., the website hosting server). These changes then populate to caching servers around the globe. This process can take several minutes (generally up to five minutes for standard pages and up to twenty minutes for changes to appear on a listing page).
Publishing Pages in Page Builder
When a user creates or updates a page using Page builder, Sitecore automatically manages the workflow state.
Page States
- New pages are created in a Draft state
- Updated pages return to the Draft state after changes are made
The current workflow state is always visible in the upper right corner of the Page builder interface.
Submit a Page for Publishing in Page Builder
In Page Builder:
- Click the Pages tab at the top of the left side panel to display the Sitemap
- Click to select the page in the Sitemap.
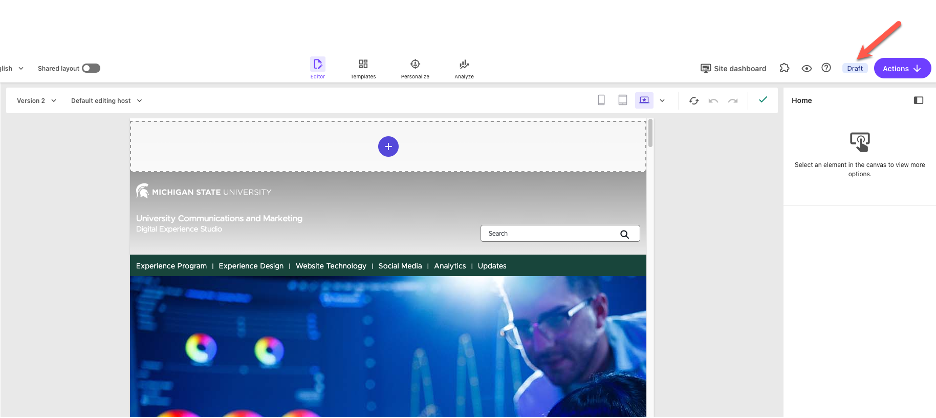
- Review the current workflow state in the upper right corner. (See Fig. 1)
- Click Actions button in the upper right corner. (See Fig. 2)
- Click Submit.
Enter a comment describing the update. Comments assist reviewers in understanding what changes were made to the page.
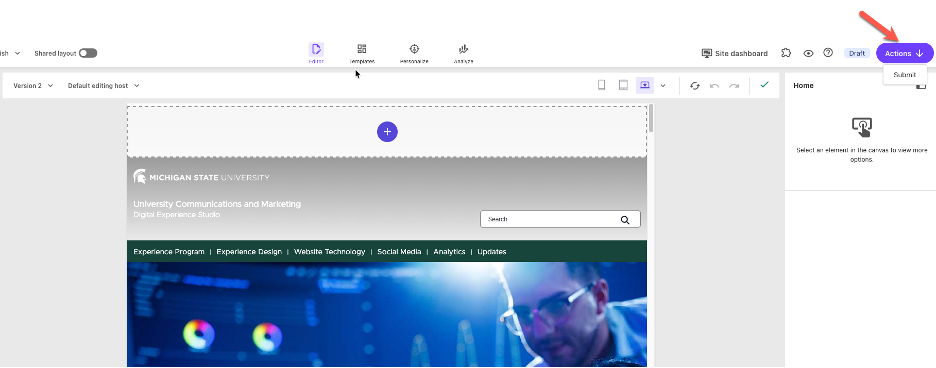
Fig. 2: The Actions button next to the current workflow state moves the page to the next stage.
As of February 10, 2026: Currently, a basic workflow is enabled. With the basic workflow submitted pages are automatically approved and no additional review steps are required.
What Happens Next in Page Builder
After submitting the page:
- The page state changes to Approved.
- The page is automatically added to the publishing queue.
- The page is published during the next scheduled publish cycle.
No additional publishing action is required.

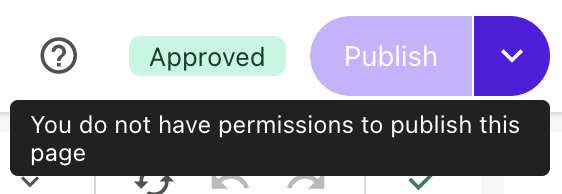
Note: If all page items have been approved and submitted to the publishing workflow, hovering over the Publish button will show a message that publishing permissions are not available. This does not mean the changes made won't publish. Anything approved has been submitted to the queue.
Approving Content at the Item Level
Users can also approve changes at the component level. This is especially useful when troubleshooting. If a component does not appear after the page publish process has completed, confirm the component does not need approval.
Method 1: Approve from the Page Items menu
- Locate the page in the Sitemap tab of the left side panel.
- Click the ellipses (...) icon to open the page menu. (See Fig. 4)
- Click Page items to open the page items menu. (See Fig. 4)
- Scroll through the list of items on the page. Any items marked "Draft" need approval. Click the Approve button. (See Fig. 5)
All items should show a status of "No workflow" or "Approved" to be eligible to be included in the publish cycle.
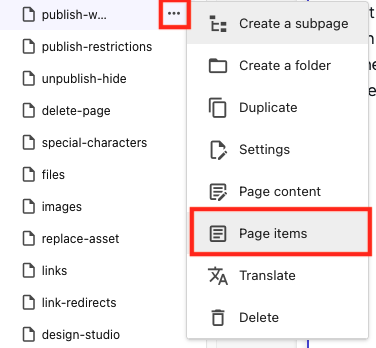
Fig. 4: The Page items option on the page menu will open the Page items menu. 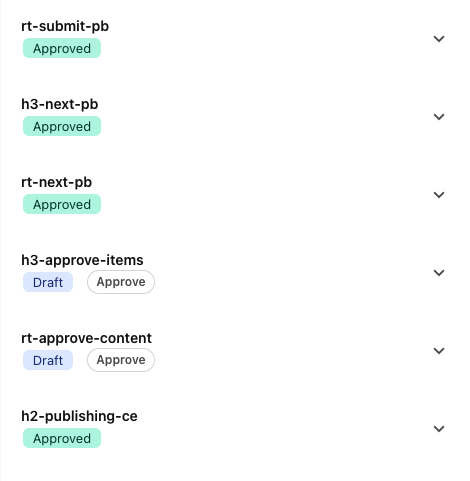
Fig. 5: The Page items menu shows the status of each item on a page.
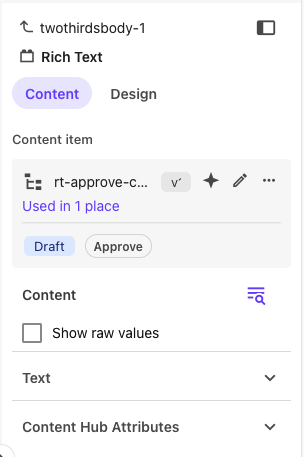
Method 2: Approve from the Component Details Panel
- Click the specific component to select it. Click the "Select parent element" on the component editing toolbar to select the component instead of the text/content within the component.
- On the right side panel, select the Content tab.
- There will be a tag indicating "Draft" or "Approved" status. If in Draft status, click the Approve button to submit the changes for approval and publishing. (See Fig. 6)
Publishing Content in Content Editor
When working in Content Editor, items must be locked before they can be edited.
Lock and Edit an Item in Content Editor
To open Content Editor:
From the Sitecore launch pad, click to select the appropriate environment. (See Fig. 7)
Fig. 7: The Sitecore launchpad includes all environments that a user has access to use. Click Content editor on the flyout menu. (See Fig. 8) Continue to step 3, below.
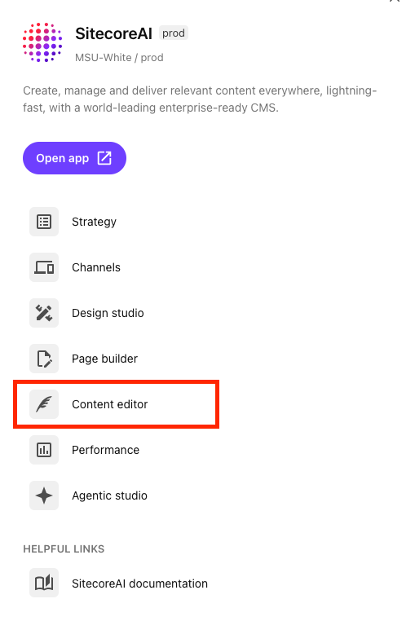
Fig. 8: The flyout menu enables users to select a tool, including Content editor.
Alternative method to open Content Editor, from Page builder:
Click the dropdown arrow to the right of the Sitecore launchpad icon in the top left corner of the screen. (See Fig. 9)

Fig. 9: The Sitecore launchpad icon includes a dropdown access panel for additional tools. Click Content editor in the dropdown menu. Content editor opens in a new browser tab. (See Fig. 10)
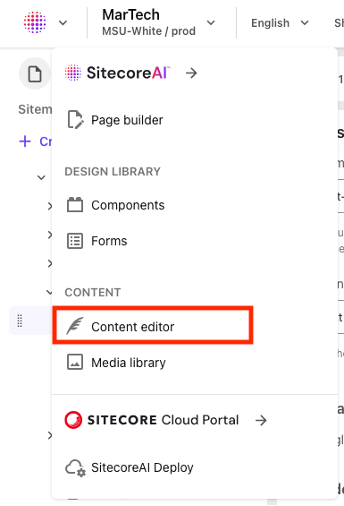
Fig. 10: Content editor is an option in the dropdown tools menu. - Expand the Content tree in the left side panel and locate the page to be edited.
- Expand the Data node for the page.
- Click on the item to be edited.
- On the yellow ribbon in the main content editing panel, click the Lock and Edit link to edit the item. (See Fig. 11)
- Edit the item, as needed.
Important: Any changes made to a site in Content Editor that are not part of a workflow process will automatically be added to the publishing queue when the change is saved.
These non-workflow changes include setting the site default featured story and featured events.
Note: When creating a new item, it is available for editing by default and does not need to be locked.

Submit Content for Publishing in Content Editor
- Click Save on the navigation ribbon to save all changes.
- Click the Edit button on the Home tab of the navigation ribbon. (See Fig. 12)
- Click Submit.
- Enter a comment describing the update. Comments assist reviewers in understanding what changes were made to the page.
- Click OK.

As of February 10, 2026: Currently, a basic workflow is enabled. With the basic workflow submitted pages are automatically approved and no additional review steps are required.
What Happens Next in Content Editor
After submitting the item edits:
- The item is approved based on the current workflow.
- The item is automatically added to the publishing queue.
- The item is published during the next scheduled publish cycle.
Important Notes
- There is no manual Publish step when workflows are enabled.
- Workflow approval determines when content is published.
- Any change made to approved content returns the item to a Draft status until it is submitted again.
- Page builder and Content editor follow the same publishing rules even though the editing experience differs.
Choosing the Correct Editing Interface
- Use Page Builder to create and update pages.
- Use Content Editor to manage structured content such as Job Cards or Education for People Data and conduct advanced editing tasks.
Both interfaces use the same workflow and publishing process.
Documentation updated: May 29, 2026
Related Resources
Publishing Restrictions
Control which pages are eligible for publishing workflows at specific times.