Websites will often use links, either in main and sidebar navigation, linked text or from buttons, to help visitors navigate the website. Read below for instructions on how to work with the various types of linking within Sitecore XM Cloud.
Internal Links
Internal links are links to another page within the same website, or to a page on another website that is also in MSU’s Sitecore XM Cloud.
Add an internal link using the text editing toolbar:
- Highlight to select the text to be linked.
- Click the Insert internal link icon in the editing toolbar.

Navigate to the page in the Internal link window and click to select.

Figure 2: The Context site dropdown is outlined on Internal link panel. - Click Add link.
Add an internal link using CTA element properties:
- Click on the CTA field in a component.
- In the element options panel on the right-side CTA menu, select Internal under Link type.
- Click Browse.
Navigate to the page in the Internal link window and click to select.
Note: To link to another MSU website in XM Cloud that you have access to, click the Context site dropdown to choose the site and then locate the page. (See Figure 2.)
- Click Add link.
- Enter text in the Link text box. This will display as the CTA button label.
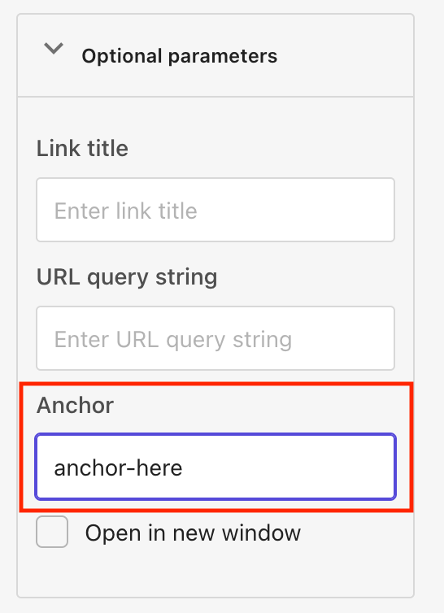
- Optional: Set additional parameters. See Anchor Links, below, for additional information on linking to an internal anchor.
External Links
External links are links to a page on a website that is not in MSU’s Sitecore XM Cloud. These could include links to campus websites in Cascade or another content management system, or off-campus websites, such as social media platforms.
Add an external link using the text editing toolbar:
- Highlight to select the text to be linked.
Click the Link icon in the editing toolbar.

Figure 3: The Link icon is outlined on a text edit toolbar within a rich text component. - Enter the full URL in the Link URL box.
- Click the green checkmark.
Add an external link using CTA element properties:
- Click on the CTA field in a component.
- In the element options panel on the right-side CTA menu, select External under Link type.
- Enter the full URL (including http:// or https://) in the Link URL box.
- Enter text in the Link text box. This will display as the CTA button label.
- Optional: Set additional parameters. See Anchor Links, below, for additional information on linking to an internal anchor.
Media Links
Media links are links to assets, including image files or document files (i.e., PDFs.) Right now PDFs should be linked using Content Editor.
Begin in Page Builder:
- Locate the nine-dot cube icon in the upper left.
- Select the environment.
- Select Content Editor.
In Content Editor:
- Locate the page in the Content Tree.
- Locate the component containing the text or call-to-action to be linked.
- To link a CTA to media: On the data panel, use the link setting tools to add a link to the CTA field.
- To link text to media:
- Click the Show editor link.
- Locate and highlight the text to be linked.
- Click the Insert Sitecore link icon.
- Use the Media Items tab to display the Media Library content tree.
- Use the Media Library content tree to locate and click on the file.
- Click Insert button to return to the editing window.
- Click Accept to lock the changes.
- Click Save on the Content Editor navigation ribbon.
- Return to Page Builder and refresh the canvas to display the changes.
Anchor Links
Anchor links are links to a specific section on a webpage. The anchor can be on the same page or a different page within a website. Anchor links must be added to the website code, so it’s best to use them when linking within the same website so the content author can control the code and ensure it is not inadvertently deleted, which would break any other site’s link to that anchor.
Add an anchor to a component in Page Builder:
Before linking to an anchor, the anchor must be placed on a page. Sitecore XM Cloud makes this easy.
Select the component that needs an anchor.
Quick tip: To account for parallax scrolling effects on a page, it is recommended to place the anchor slightly above the text that needs the anchor. Adding an anchor to a subheading component above the content works well.
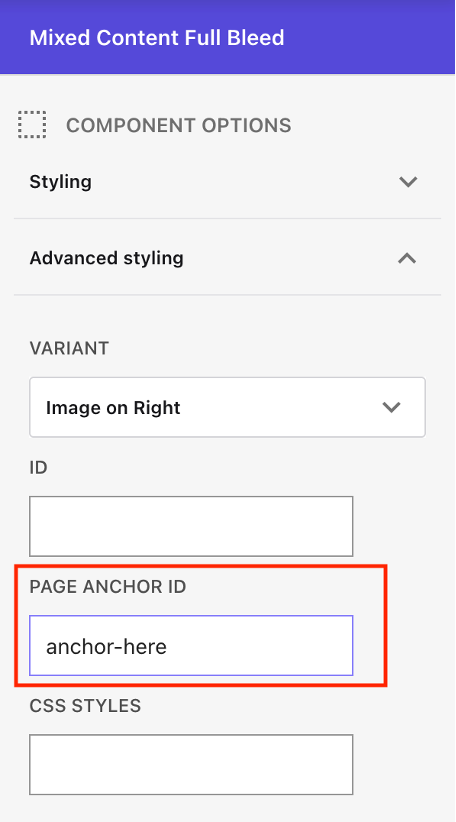
- Expand the Advanced styling panel in the Component options menu on the right side of the screen.
Enter the desired anchor text in the Page Anchor ID field.
Requirements: Keep the anchor text brief, all lowercase with no spaces and be sure the anchor is unique within the website.

Figure 5: The Page Anchor ID field is outlined in the Advanced styling tab of a component options menu. 4. Save and Publish.
Link to an anchor:
- Identify the anchor to be used for the anchor link. This is the anchor text added using the Page Anchor ID field, described above.
- To link to an anchor on the same page, use the external link option and add the anchor text only, preceded by #.
- Example: #anchor-here
- To link to an anchor on another page using a full URL, add the anchor to the end of the URL following a “#” symbol.
- Example: https://brand.msu.edu/logos#anchor-here
- To link to an anchor on another page, use the insert link option. Then edit the link to add the anchor text, preceded by #, to the end of the character string.
- To link to an anchor on another page using the CTA element properties panel, add the anchor to the anchor field in the Optional parameters panel for internal link types.

Documentation updated: Oct. 21, 2025
Note: To link to another MSU website in XM Cloud that you have access to, click the Context site dropdown to choose the site and then locate the page.