Jump to HeaderJump to Main ContentJump to Footer
Digital Experience Studio
  • Experience Program
  • Experience Design
  • Website Technology
  • Social Media
  • Analytics
  • News and Events

< Experience Program

  • Website Project Process
  • Working with a Vendor
  • Glossary
  • Taxonomy Data Dictionary

< Experience Design

  • Website Strategy
  • Website Structure
  • Information Architecture and Navigation
  • User-Centered Design Conventions
  • Common UX Issues
  • Enterprise Design System
  • Content Planning
  • Creating Accessible Content
  • Taxonomy and Filters

< Website Technology

  • Web Standards
  • Search Engine Optimization
  • Cascade CMS
  • Sitecore CMS
  • Content Hub Overview
  • Content Hub DAM
  • Content Hub Operations

SitecoreAI

Sitecore user login

< Social Media

  • Alt Text Bookmarklet
  • Meta Ad Pixel
  • Social Media and Web Integration
  • Sprinklr

Sprinklr

Sprinklr user login

< Analytics

  • Google Analytics (GA4)
  • Testing
  • Data Visualization

Google Analytics

Google Analytics user login

< News and Events

  • News and Updates
  • Events and Trainings

MSU Tools and Resources

  • A to Z Index
  • Find People
  • Email
  • Tech Support
  • Social Media Directory
Michigan State University
Digital Experience Studio

University Communications and Marketing

Digital Experience Studio

  • Experience Program
    • Website Project Process
    • Working with a Vendor
    • Glossary
    • Taxonomy Data Dictionary
  • |
  • Experience Design
    • Website Strategy
    • Website Structure
    • Information Architecture and Navigation
    • User-Centered Design Conventions
    • Common UX Issues
    • Enterprise Design System
    • Content Planning
    • Creating Accessible Content
    • Taxonomy and Filters
  • |
  • Website Technology
    • Web Standards
    • Search Engine Optimization
    • Cascade CMS
    • Sitecore CMS
    • Content Hub Overview
    • Content Hub DAM
    • Content Hub Operations

    SitecoreAI

    Sitecore user login
  • |
  • Social Media
    • Alt Text Bookmarklet
    • Meta Ad Pixel
    • Social Media and Web Integration
    • Sprinklr

    Sprinklr

    Sprinklr user login
  • |
  • Analytics
    • Google Analytics (GA4)
    • Testing
    • Data Visualization

    Google Analytics

    Google Analytics user login
  • |
  • News and Events
    • News and Updates
    • Events and Trainings

University Communications and Marketing

Digital Experience Studio > Website Technology > Sitecore CMS > Sitecore Component Guide >

Alert

Alert

The Alert component creates a special content box on all pages of a site to display an emergency alert message. Depending on the alert level, the amount of the site’s homepage content displayed on screen will change.

Component Information

  • Usage
  • Best Practices
  • Template Data
  • Related Information

Benefits

  • Alert components enable the university to quickly disseminate emergency information to website audiences during times of crisis.

Alert Levels

  • Level 1: Sitewide banner message 
  • Level 2: Replaces the homepage hero banner. Other pages on the website will have a Level 1 banner message.
  • Level 3: Replaces all homepage content

Component Options and Limitations

  • The Alert component is not available to content authors. 
  • If an alert is needed, contact a system administrator.

Guidelines

  • Alerts are for displaying high-level emergency information only.
  • For displaying nonemergency information in an alert-like box on a page, choose either a Promo Bar that appears at the top of a page or an Info Panel that can be added in the main body of a page.

Alert – Details Section

Title (single-line text)
  • An internal system name for the alert.
  • This field does not display publicly.
Teaser Short (multi-line text)
  • This text that is displayed in a Level 1 Alert banner
  • This field is required for all alert levels. 
Teaser Long (rich text)
  • This text is displayed for Level 2 and Level 3 Alerts.
  • This field is required for Level 2 and Level 3 Alerts. 
CTA Link (general link)
  • URL for the call to action
  • The display text comes from the link description.

Site - Alert Section

Alert Level
  • This sets the Alert level for the entire website.
  • Whichever level is selected will apply to all pages of the site.
  • Alert level options are:
    • Level 1: Sitewide banner message
    • Level 2: Replaces the homepage hero banner. All other pages on the website will have a Level 1 banner message.
    • Level 3: Replaces all homepage content 
Alert Data (droplist)
  • Choose the Alert to display from the Global Alerts folder.

Related Components

  • Promo Bar — A nonemergency equivalent in which Promo bars appear at the top of a page
  • Info Panel — A nonemergency component that can be added in the main body of a page

Communications Resources

  • University Communications and Marketing
  • University Trademarks and Licensing
  • MSU Brand Studio
  • MSU Editorial Style Guide
  • MSU Photos

Contact us

517-355-7505

Address

Michigan State University 408 West Circle Drive East Lansing, MI 48824

Follow Us

  • Visit our Facebook page
  • Visit our page on X
  • Visit our Instagram page
  • Visit our LinkedIn page
  • Visit our YouTube page
  • Visit our TikTok page

If you're having accessibility issues, please let us know.

Know MoreTransparency Reporting: Budget & Salary/Compensation
  • Contact Information|
  • Site Map|
  • Privacy Statement|
  • Site Accessibility|
  • Call MSU: (517) 355-1855|
  • Visit: msu.edu|
  • Notice of Nondiscrimination|

SPARTANS WILL|© Michigan State University|

Frequently Asked Questions

Can I, as a regular content author, set up an alert for my website?

No. Contact a system administrator to add alerts. 

Can I put any message I want in an Alert and have it added to my website?

No, the Alert is only for high-level emergency messages.

Instructions for Use

Alerts are set up by system administrators in Content Editor in the Shared Sites > Data > Global Alerts folder.
  1. Fill out all Alert fields. Save and submit when finished.
  2. Once an Alert has been created, it is activated on a site by selecting the site name node and choosing the alert Level and the Active Alert in the Alerts section.
  3. Select the Alert to use and select the needed Alert level.
    • Level 1: Sitewide banner message
    • Level 2: Replaces homepage hero banner. The other pages on the website will have a Level 1 banner message.
    • Level 3: Replaces all homepage content. The other pages on the website will have a Level 1 banner message.
  4. Save and submit to send the component to the publishing workflow.
  5. The Home page will need to be republished after the alert component has been loaded. If need be, click the Version # dropdown and click + Create version to create a new version of the home page, enabling the Actions and Submit button options so the Home page can be republished.


Variant Examples

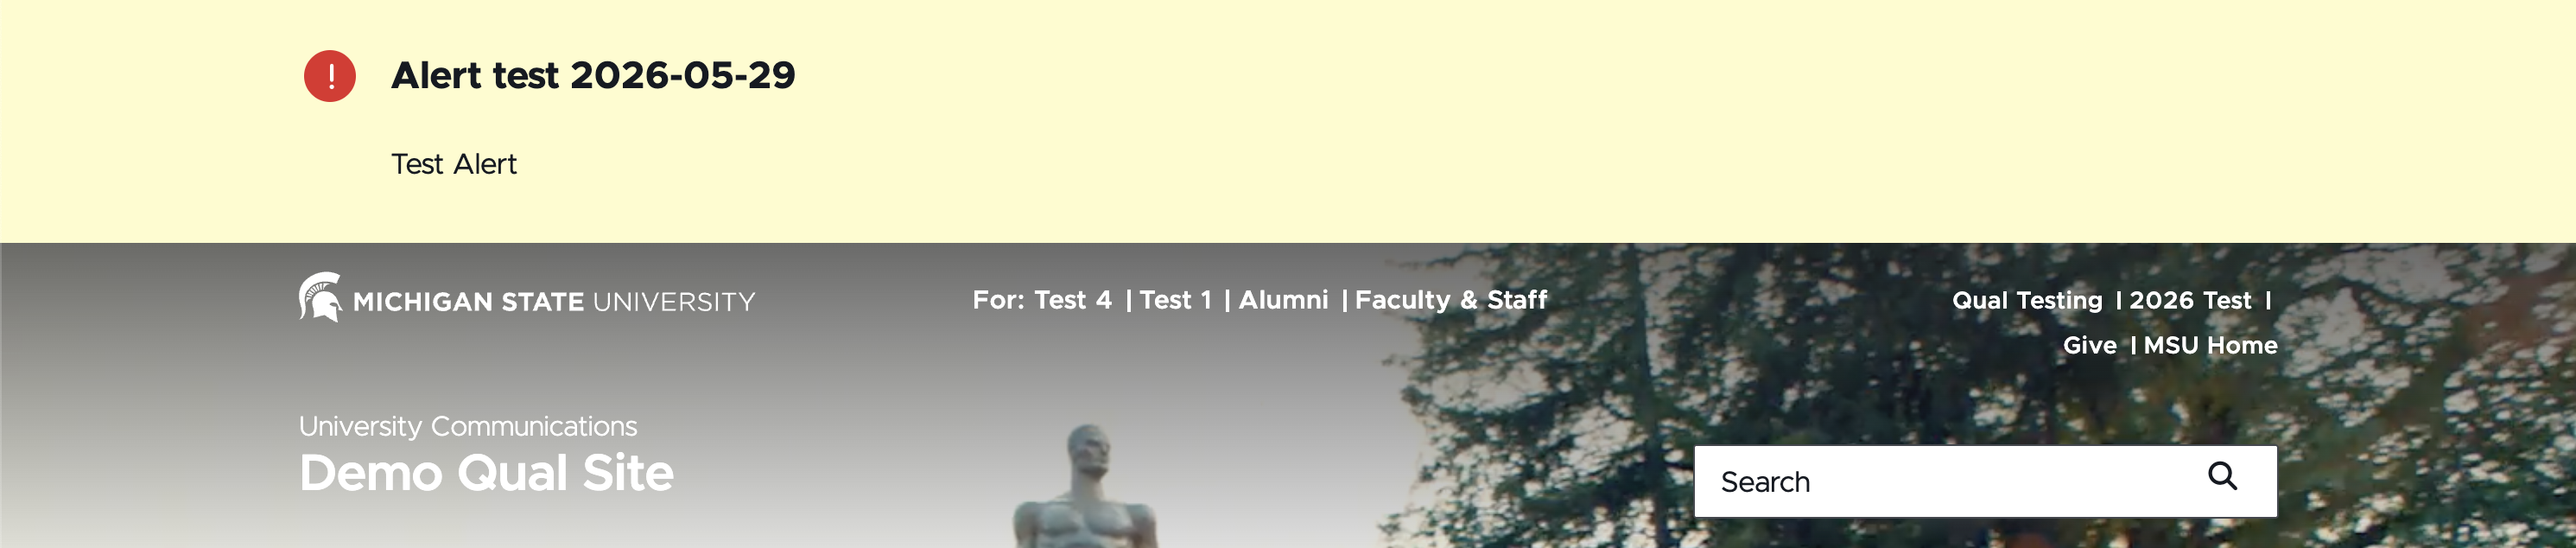
Level 1
Screenshot of a level 1 alert: A yellow banner appears at the top of the
Figure 1: A level 1 alert banner appears above the hero banner on the home page. All other webpage content appears as normal.
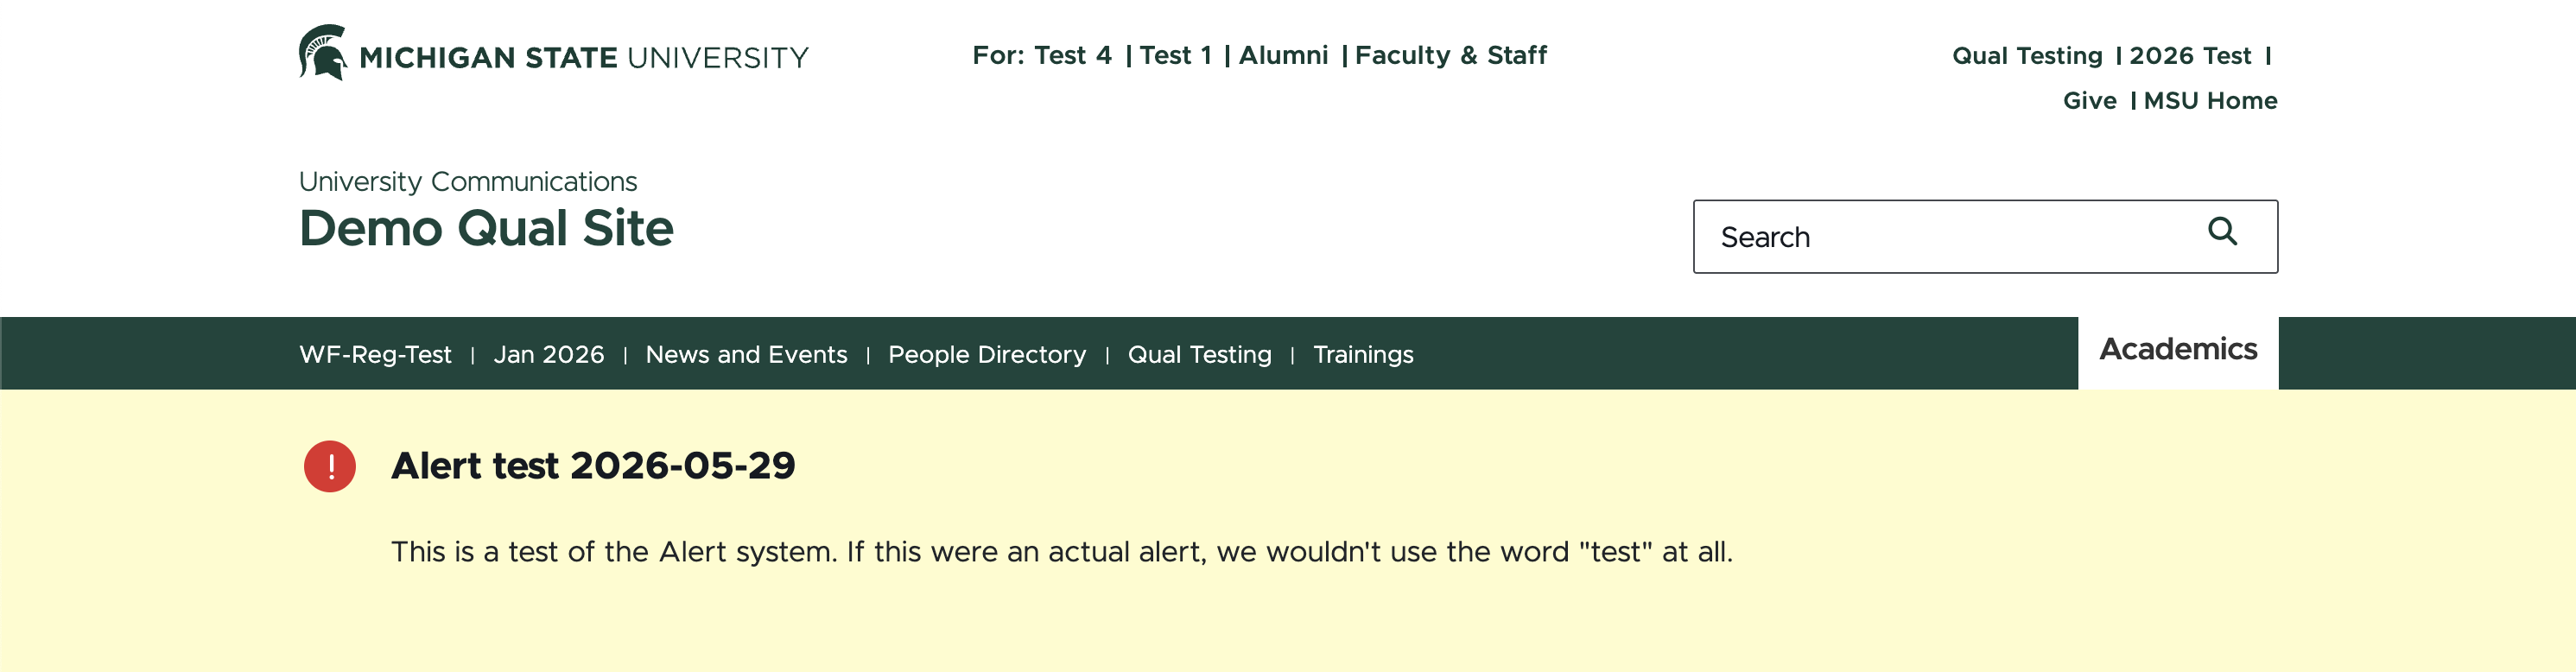
Level 2
Screenshot of a level 2 alert banner. A yellow banner appears in place of the page hero banner, below the navigation. A red exclamation point in a red circle is followed by bold, black text reading
Figure 2: A level 2 alert banner appears below the navigation in place of the hero banner on the home page. All other webpage content appears as normal.
Level 3
Screenshot of a level 2 alert banner. A yellow banner appears in place of the page hero banner, below the navigation. A red exclamation point in a red circle is followed by bold, black text reading
Figure 3: A level 3 alert banner appears below the navigation on the home page. All other webpage content appears as normal.

Tool Use Guide


Documentation updated: June 29, 2026

Is there an issue with this documentation? Report it here.