Jump to HeaderJump to Main ContentJump to Footer
Michigan State University
Digital Experience Studio

University Communications and Marketing

Digital Experience Studio

  • Experience Program
    • Website Project Process
    • Working with a Vendor
    • Glossary
    • Taxonomy Data Dictionary
  • |
  • Experience Design
    • Website Strategy
    • Website Structure
    • Information Architecture and Navigation
    • User-Centered Design Conventions
    • Common UX Issues
    • Enterprise Design System
    • Content Planning
    • Creating Accessible Content
    • Taxonomy and Filters
  • |
  • Website Technology
    • Web Standards
    • Search Engine Optimization
    • Cascade CMS
    • Sitecore CMS
    • Content Hub Overview
    • Content Hub DAM
    • Content Hub Operations

    SitecoreAI

    Sitecore user login
  • |
  • Social Media
    • Alt Text Bookmarklet
    • Meta Ad Pixel
    • Social Media and Web Integration
    • Sprinklr

    Sprinklr

    Sprinklr user login
  • |
  • Analytics
    • Google Analytics (GA4)
    • Testing
    • Data Visualization

    Google Analytics

    Google Analytics user login
  • |
  • News and Events
    • News and Updates
    • Events and Trainings
Digital Experience Studio

University Communications and Marketing

  • Experience Program
  • Experience Design
  • Website Technology
  • Social Media
  • Analytics
  • News and Events

< Experience Program

  • Website Project Process
  • Working with a Vendor
  • Glossary
  • Taxonomy Data Dictionary

< Experience Design

  • Website Strategy
  • Website Structure
  • Information Architecture and Navigation
  • User-Centered Design Conventions
  • Common UX Issues
  • Enterprise Design System
  • Content Planning
  • Creating Accessible Content
  • Taxonomy and Filters

< Website Technology

  • Web Standards
  • Search Engine Optimization
  • Cascade CMS
  • Sitecore CMS
  • Content Hub Overview
  • Content Hub DAM
  • Content Hub Operations

SitecoreAI

Sitecore user login

< Social Media

  • Alt Text Bookmarklet
  • Meta Ad Pixel
  • Social Media and Web Integration
  • Sprinklr

Sprinklr

Sprinklr user login

< Analytics

  • Google Analytics (GA4)
  • Testing
  • Data Visualization

Google Analytics

Google Analytics user login

< News and Events

  • News and Updates
  • Events and Trainings
Digital Experience Studio > Website Technology > Sitecore CMS > Sitecore Component Guide > People Directory >

Person Details Page

MSU Tools and Resources

  • A to Z Index
  • Find People
  • Email
  • Tech Support
  • Social Media Directory

Communications Resources

  • University Communications and Marketing
  • University Trademarks and Licensing
  • MSU Brand Studio
  • MSU Editorial Style Guide
  • MSU Photos

Contact us

517-355-7505

Address

Michigan State University 408 West Circle Drive East Lansing, MI 48824

Follow Us

  • Visit our Facebook page
  • Visit our page on X
  • Visit our Instagram page
  • Visit our LinkedIn page
  • Visit our YouTube page
  • Visit our TikTok page

If you're having accessibility issues, please let us know.

Know MoreTransparency Reporting: Budget & Salary/Compensation
  • Contact Information|
  • Site Map|
  • Privacy Statement|
  • Site Accessibility|
  • Call MSU: (517) 355-1855|
  • Visit: msu.edu|
  • Notice of Nondiscrimination|

SPARTANS WILL|© Michigan State University|

Person Details Page

Each People Directory item creates a Person Details Page, comprised of template data common to directory profiles with the ability add additional features, including Job Cards, Education, Awards, Publications and Research Grants. What makes a Person Details Page unique is the data template behind it: Person Details Pages have additional fields to power taxonomy filters and to automate inclusion of the individuals on the People Listing Page to automatically populate a directory. 
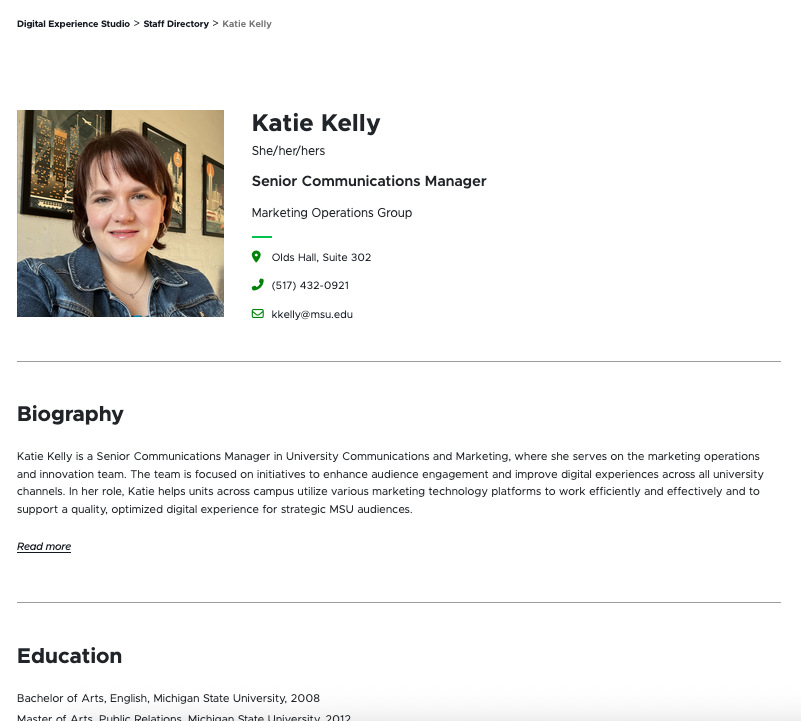
Screenshot of a person details page for Katie Kelly
Figure 1: A screenshot of a Person Details Page.

Note: The People Directory is designed to share a listing and profile information for active or emeritus MSU faculty and staff. It should not be used for former (not retired) employees or for in memoriam content. 

Frequently Asked Questions

How does a unit get People Directory added to a website?

To request the People Directory feature by activated on a unit website, fill out and submit this form. 

The digital experience program manager will generate a ticket, and a member of the University Communications and Marketing platforms group will activate the feature on the website.

Template Data

Many of the data template fields that make Person Details Pages and People Listing Pages so powerful are only available in Content Editor. 

Person Details Page Fields

Name Section

First Name (single-line text)

  • Required field. 

Note: This is the first name that will display in Author or Media Contacts.

Middle Name (single-line text)

  • Optional field.

Last Name (single-line text)

  • Required field.
  • This field controls alphabetical sorting of users by name.

Display Name (single-line text)

  • Required field.
  • Future use case: When News Contact profile pages are created, this Display Name field will control how names display on the page. 

Note: As of this time, this field does not impact display of the News Contact name in Author or Media Contacts on a story page. Enter the first and last names as they should be displayed in those respective fields.

Prefix (single-line text)

  • Optional field.

Suffix (single-line text)

  • Optional field.

Pronoun (droplist)

  • Optional field but strongly encouraged as best practice.
  • Options: He, She, They
  • The full string of appropriate pronouns will display on the front end (i.e., he/him, she/her, they/them)

Pronoun Override (single-line text)

  • Optional field.
  • Users who prefer an alternative appropriate pronoun set may enter their pronouns in this field.
  • Text in this field will override any setting in the Pronouns field. 

Net ID (single-line text)

  • Optional field.
  • Any user added who has an MSU Net ID should include the ID here. 

Additional Content Fields

Job Cards are meant to represent active role assignments at Michigan State University. Individuals can have multiple job cards to reflect multiple assignments and roles. The order of the Job Cards listed under a Person Detail Page in the Content Tree controls the order of roles listed on the Person Details Page. To change the order of roles, click and drag to adjust the order of Job Cards in the Content Tree. The first card is considered the Primary Job Card.

Job Card Fields

Job Title (single-line text)

  • Required field.

College (droplist)

  • Optional field.

Unit (droplist)

  • Optional field.
  • Select from the global taxonomy. Most MAUs on campus are reflected in this taxonomy. Contact University Communications and Marketing to suggest an addition if a unit appears to be missing.  

Office and Center

  • Optional field.
  • Select from site-specific taxonomy.

Employment Type (droplist)

  • Optional field.
  • Select from the global taxonomy of employment types, approved by MSU Human Resources.

Instructions for Use


Note: The People Directory feature must be activated on the website by University Communications and Marketing before it can be used. 

Tip for using Content Editor: Users must have “Hidden Items” and “Buckets” checked in the View tab of the Content Editor navigation ribbon to view directory-related items in the Content Tree in Content Editor.

Request People Directory feature activation

To request the People Directory feature by activated on a unit website, fill out and submit this form. 

The digital experience program manager will generate a ticket, and a member of the University Communications and Marketing platforms group will activate the feature on the website.

Image Specifications

Listing Page Image

  • Desktop - Width: 257px, Height: 257px
  • Mobile - Width: 212px, Height: 212px
  • Recommended Size: Width: 300px | Height: 300px

Detail Page Image

  • Desktop - Width: 310px, Height: 310px
  • Mobile - Width: 212px, Height: 212px
  • Recommended Size: Width: 300px | Height: 300px

Tool Use Guide


Documentation updated: June 10, 2026

Is there an issue with this documentation? Report it here.

Can a unit customize the taxonomy (i.e., filter labels and options) for the people on the website?

Yes and no. Units can customize the options within some filter categories, but not the categories themselves. This is because creating or modifying categories requires custom development. If a unit has a need for a new filter category, contact University Communications and Marketing to discuss your use case. There may be unit expense related to the custom development of additional category filters. University Communications and Marketing will discuss options with the unit prior to moving forward with any work that may lead to expenses. 

Area of Expertise is site-specific and can be used as a filter. Backend Tags are site-specific and can support search results but cannot be used as a filter. 

Name Prefix is a global standardized list. To suggest an additional prefix, contact University Communications and Marketing. Pronouns are a global standardized list corresponding to MSU’s Chosen Name and Pronoun Policy, but there is a Pronoun Override field for users who require a pronoun option not included in the list. 

Area of Study is a global list corresponding to the career tracks used by Career Services and the Office of Admissions to assist prospective and current students in exploring educational and employment opportunities. Employment Types is a global list based on employment classifications and approved by MSU Human Resources. Both Area of Study and Employment Types can be used as filters.


Why can’t a user see Person Details items in their site’s Content Tree in Content Editor?

This typically occurs when “Hidden Items” and “Buckets” are not selected to display in Content Editor. 

Screenshot of the View tab in the Content Editor navigation ribbon showing that Content Tree, Entire Tree, Hidden Items and Buckets are checked so they will display
Figure 2: The “Hidden Items” and “Buckets” options are checked in the View tab of the Content Editor navigation ribbon.

In Content Editor:

  1. Click the “View” tab on the navigation ribbon.
  2. Check Hidden Items and Buckets.
  3. Items should now be visible in the Content Tree.

If you’re still experiencing issues, contact University Communications and Marketing to generate a support ticket. Include the website URL and details regarding the People Directory items you’re expecting to see. 


Where did a newly created Person Details Page move to? 

Person Details Pages are automatically bucketed by first letter of the last name. When a content author edits the last name field, the page will move to the corresponding letter bucket. 

Can Person Details Pages be scheduled to publish at a specific later date and time?

Not currently. Users can set a timeframe for when a Person Details Page is “publishable” to ensure it isn’t accidentally published too early, but the Person Details Page must be manually published during the “publishable” window. 

See “Publish a Page” for instructions. 

Biography Information Section

Short Bio (multiline text)

  • Required field.
  • This appears as a short blurb about the individual in the People Listing Page. 

Long Bio (multiline text)

  • Required field.
  • This appears as a full biography section for the individual on the Person Details Page. 
Contact Details Section

Phone Number (single-line numeric)

  • Optional field.
  • Provides phone contact information for the individual.
  • Website visitors can click to call from their device.

Email (single-line text)

  • Required field.
  • Provides an email address for the individual.

Location (single-line text)

  • Optional field.
  • Provides an address for the individual.
Image Section

Image

  • Optional field.
  • This will appear on the Person Details Page and People Listing Page. 
Tagging Section

Area of Study

  • Optional field.
  • This aligns to the prospective student area of study tracks.
  • Future use case: This can appear for the individual on their profile page. 

Area of Expertise

  • Optional field.
  • This will be a site-specific list of topics of expertise.
  • Future use case: This can appear for the individual on their profile page. 

Backend Tags

  • Optional field.
  • This will be a site-specific list of backend tags used to support search results.
  • The same backend tag list is used for News, Events and People Directory.

Tags

  • This field is reserved for future global tag development use.
Personal Website Section

Websites 1-3 (link)

  • Optional fields.
  • Person Details Pages can include up to three links, such as portfolio, CV, link to a lab website or social media profile pages.

Note: This link space should not be used for affiliate links (i.e., links by which the user receives income from resulting purchases.)

Content Section

Title (single-line text)

  • Required field.
  • This is the page title displayed as the H1 tag and appears on the page as the story headline. 

Browser Title (single-line text)

  • Optional field.
  • This title appears on the browser’s tab or top bar.
  • If no text is placed here, the browser tab will show the Page Title.
Metatags Section

Meta Description (single-line text)

  • Add a description of the page to this field.
  • This assists with search engine optimization and provides users a quick summary of what they can expect to find on the page. See “Search Engine Optimization” for additional information.

Meta Keywords (single-line text)

  • Add keywords to this field to guide search engines on what this page content is about. See “Search Engine Optimization” for additional information. 

No Index (checkbox)

  • Check this box if search engine or AI crawlers should not index the page.

No Follow (checkbox)

  • Check this box if search engines should not follow links to the page.

Canonical (single-line text)

  • If the same content appears on multiple pages or websites, include the full URL of the webpage that search engines should treat as canon (i.e., most important). 
Open Graph Section

Open Graph Title (single-line text)

  • This field controls the headline that appears when a Person Details Page is shared via social media, web search, texting, etc. 

Open Graph Type (droplist)

  • This setting defaults to website for Person Details Pages.

Open Graph Image (image selection)

  • This field controls the thumbnail image that accompanies the Person Details Page when it is shared via social media, web search, texting, etc.

Open Graph URL (single-line text)

  • This field controls the open graph tag related to the page being shared, indicating the canonical URL of the web page to define how a shared link is displayed. 
Education Fields

Text (single-line text)

  • Required field.

The MSU Editorial Style Guide recommends formatting degree information in this manner:

Degree Type, Field of Study, Year

For example: Bachelor of Arts, English, 2008

Link (link selector)

  • Optional field.
  • Use to link to a university website for the institution that granted the degree. The full line of text will be linked.
Award Fields

Text (single-line text)

  • Required field.
  • Use to specify the award name.

Link (link selector)

  • Optional field.
  • Use to link to a web page providing additional information on the award or to a news release related to the award.
Publication Fields

Text (single-line text)

  • Required field.
  • Use to specify the publication name (e.g., article or book).

Link (link selector)

  • Optional field.
  • Use to link to a web page with additional information about the publication. 

Note: This link space should not be used for affiliate links (i.e., links by which the user receives income from resulting purchases.)

Research Grant Fields

Text (single-line text)

  • Required field.
  • Use to specify the grant or project name.

Link (link selector)

  • Optional field.
  • Use to link to a web page or website with additional information about the grant or project. 
Create a Person

In Content Editor:

  1. Locate the People Directory Listing Page. The default location is found by expanding MSU node, website name, Home node and clicking the Faculty node. If the People Directory listing page has been renamed from the default Faculty, the new name will be reflected here.
  2. Right click on Faculty, click Insert and click Person Details Page.
  3. Name your Person Detail Page. Click OK.
Screenshot of the content tree expanded to Staff Directory, then Insert and Person Details Page
Figure 3: The Person Details Page option appears after clicking Insert on the Faculty page in the Content Tree. 

Alternative: In Page Builder

  1. Navigate to the Faculty page in the Content Tree.
  2. Click the “…” icon next to the page name.
  3. Click Create a subpage on the flyout menu.
Edit Person Details 

In Content Editor

  1. Click on the Person Details Page in the Content Tree.
  2. Add or edit content in any data field.
  3. Add or edit tags in the Tagging section, as needed.
  4. Click Save.

Alternative: In Page Builder

  1. Navigate to the Person Details Page in the Content Tree.
  2. Click on text placeholder in any field on the page and edit.

Note: Job Cards, Education, Awards, Publications and Research Grants must be added in Content Editor before they can be edited in Page Builder.

Add or Edit a Job Card in Content Editor

To add a new Job Card in Content Editor:

  1. Expand the specific Person Details Page node.
  2. Right click on the Job Cards folder.
  3. Click Insert.
  4. Click Job Card.
  5. Enter name for the Job Card.
  6. Enter details on the Job Card data template. Note: Choose Unit or Office and Center, not both, on an individual Job Card.
  7. Click Save.
  8. Click Review tab in navigation and click Approve to send changes to the publishing workflow.

To edit a Job Card in Content Editor:

  1. Expand the specific Person Details Page node.
  2. Expand Job Cards folder.
  3. Click on the specific Job Card to be edited.
  4. Enter details on the Job Card data template. Note: Choose Unit or Office and Center, not both, on an individual Job Card.
  5. Click Save.
  6. Click Review tab in navigation and click Approve to send changes to the publishing workflow.

To change the order of Job Cards displayed on a Person Details Page:

  1. In Content Editor, expand the specific Person Details Page node.
  2. Expand Job Cards folder.
  3. Right click on the Job Cards folder.
  4. Click to select a Job Card, drag and drop it to reorder the cards.
  5. Click Save.
  6. Click the specific Person Details Page.
  7. Click Review tab in navigation and click Approve to send changes to the publishing workflow.

To delete a Job Card for a position that is no longer active:

  1. Expand the specific Person Details Page node.
  2. Expand Job Cards folder.
  3. Right click on the specific Job Card to be deleted.
  4. Click Delete.
  5. Click the specific Person Details Page.
  6. Click Review tab in navigation and click Approve to send changes to the publishing workflow.
Add or Edit Education Details in Content Editor

To add a new Education item in Content Editor:

  1. Expand the Person Details Page node.
  2. Right click on the People Items folder.
  3. Click Insert.
  4. Click Education.
  5. Enter name for the Education detail.
  6. Enter details on the Education data template.
  7. Click Save.
  8. Click Review tab in navigation and click Approve to send changes to the publishing workflow.

To edit an Education item in Content Editor:

  1. Expand the Person Details Page node.
  2. Expand People Items folder.
  3. Click on the specific Education item to be edited.
  4. Enter details on the Education data template.
  5. Click Save.
  6. Click Publish tab in navigation, click Publish and Publish Item.

To change the order of Education items displayed on a Person Details Page:

  1. In Content Editor, expand the Person Details Page node.
  2. Expand People Details folder.
  3. Click to select an Education item, drag and drop it to reorder the cards.
  4. Click Save.
  5. Click the Person Details Page.
  6. Click Review tab in navigation and click Approve to send changes to the publishing workflow.

To delete an Education item:

  1. Expand the Person Details Page node.
  2. Expand People Details folder.
  3. Right click on the specific Education item to be deleted.
  4. Click Delete.
  5. Click the Person Details Page.
  6. Click Review tab in navigation and click Approve to send changes to the publishing workflow.
Add or edit Award details in Content Editor

To add a new Award item in Content Editor:

  1. Expand the Person Details Page node.
  2. Right click on the People Items folder.
  3. Click Insert.
  4. Click Award.
  5. Enter name for the Award detail.
  6. Enter details on the Award data template.
  7. Click Save.
  8. Click Review tab in navigation and click Approve to send changes to the publishing workflow.

To edit an Award item in Content Editor:

  1. Expand the Person Details Page node.
  2. Expand People Items folder.
  3. Click on the specific Award item to be edited.
  4. Enter details on the Award data template.
  5. Click Save.
  6. Click Review tab in navigation and click Approve to send changes to the publishing workflow.

To change the order of Award items displayed on a Person Details Page:

  1. In Content Editor, expand the Person Details Page node.
  2. Expand People Details folder.
  3. Click to select an Award item, drag and drop it to reorder the cards.
  4. Click Save.
  5. Click the Person Details Page.
  6. Click Review tab in navigation and click Approve to send changes to the publishing workflow.

To delete an Award item:

  1. Expand the Person Details Page node.
  2. Expand People Details folder.
  3. Right click on the specific Award item to be deleted.
  4. Click Delete.
  5. Click the Person Details Page.
  6. Click Review tab in navigation and click Approve to send changes to the publishing workflow.
Add or edit Publication details in Content Editor

To add a new Publication item in Content Editor:

  1. Expand the Person Details Page node.
  2. Right click on the People Items folder.
  3. Click Insert.
  4. Click Publication.
  5. Enter name for the Publication detail.
  6. Enter details on the Publication data template.
  7. Click Save.
  8. Click Review tab in navigation and click Approve to send changes to the publishing workflow.

To edit a Publication item in Content Editor:

  1. Expand the Person Details Page node.
  2. Expand People Items folder.
  3. Click on the specific Publication item to be edited.
  4. Enter details on the Publication data template.
  5. Click Save.
  6. Click Review tab in navigation and click Approve to send changes to the publishing workflow.

To change the order of Publication items displayed on a Person Details Page:

  1. In Content Editor, expand the Person Details Page node.
  2. Expand People Details folder.
  3. Click to select a Publication item, drag and drop it to reorder the cards.
  4. Click Save.
  5. Click the Person Details Page.
  6. Click Review tab in navigation and click Approve to send changes to the publishing workflow.

To delete a Publication item:

  1. Expand the Person Details Page node.
  2. Expand People Details folder.
  3. Right click on the specific Publication item to be deleted.
  4. Click Delete.
  5. Click the Person Details Page.
  6. Click Review tab in navigation and click Approve to send changes to the publishing workflow.
Add or edit Research Grant details in Content Editor

To add a new Research Grant item in Content Editor:

  1. Expand the Person Details Page node.
  2. Right click on the People Items folder.
  3. Click Insert.
  4. Click Research Grant.
  5. Enter name for the Research Grant detail.
  6. Enter details on the Research Grant data template.
  7. Click Save.
  8. Click Review tab in navigation and click Approve to send changes to the publishing workflow.

To edit a Research Grant item in Content Editor:

  1. Expand the Person Details Page node.
  2. Expand People Items folder.
  3. Click on the specific Research Grant item to be edited.
  4. Enter details on the Research Grant data template.
  5. Click Save.
  6. Click Review tab in navigation and click Approve to send changes to the publishing workflow.

To change the order of Research Grant items displayed on a Person Details Page:

  1. In Content Editor, expand the Person Details Page node.
  2. Expand People Details folder.
  3. Click to select a Research Grant item, drag and drop it to reorder the cards.
  4. Click Save.
  5. Click the Person Details Page.
  6. Click Review tab in navigation and click Approve to send changes to the publishing workflow.

To delete a Research Grant item:

  1. Expand the Person Details Page node.
  2. Expand People Details folder.
  3. Right click on the specific Research Grant item to be deleted.
  4. Click Delete.
  5. Click the Person Details Page.
  6. Click Review tab in navigation and click Approve to send changes to the publishing workflow.
