Jump to HeaderJump to Main ContentJump to Footer
Michigan State University
Digital Experience Studio

University Communications and Marketing

Digital Experience Studio

  • Experience Program
    • Website Project Process
    • Working with a Vendor
    • Glossary
    • Taxonomy Data Dictionary
  • |
  • Experience Design
    • Website Strategy
    • Website Structure
    • Information Architecture and Navigation
    • User-Centered Design Conventions
    • Common UX Issues
    • Enterprise Design System
    • Content Planning
    • Creating Accessible Content
    • Taxonomy and Filters
  • |
  • Website Technology
    • Web Standards
    • Search Engine Optimization
    • Cascade CMS
    • Sitecore CMS
    • Content Hub Overview
    • Content Hub DAM
    • Content Hub Operations

    SitecoreAI

    Sitecore user login
  • |
  • Social Media
    • Alt Text Bookmarklet
    • Meta Ad Pixel
    • Social Media and Web Integration
    • Sprinklr

    Sprinklr

    Sprinklr user login
  • |
  • Analytics
    • Google Analytics (GA4)
    • Testing
    • Data Visualization

    Google Analytics

    Google Analytics user login
  • |
  • News and Events
    • News and Updates
    • Events and Trainings
Digital Experience Studio

University Communications and Marketing

  • Experience Program
  • Experience Design
  • Website Technology
  • Social Media
  • Analytics
  • News and Events

< Experience Program

  • Website Project Process
  • Working with a Vendor
  • Glossary
  • Taxonomy Data Dictionary

< Experience Design

  • Website Strategy
  • Website Structure
  • Information Architecture and Navigation
  • User-Centered Design Conventions
  • Common UX Issues
  • Enterprise Design System
  • Content Planning
  • Creating Accessible Content
  • Taxonomy and Filters

< Website Technology

  • Web Standards
  • Search Engine Optimization
  • Cascade CMS
  • Sitecore CMS
  • Content Hub Overview
  • Content Hub DAM
  • Content Hub Operations

SitecoreAI

Sitecore user login

< Social Media

  • Alt Text Bookmarklet
  • Meta Ad Pixel
  • Social Media and Web Integration
  • Sprinklr

Sprinklr

Sprinklr user login

< Analytics

  • Google Analytics (GA4)
  • Testing
  • Data Visualization

Google Analytics

Google Analytics user login

< News and Events

  • News and Updates
  • Events and Trainings
Digital Experience Studio > Website Technology > Sitecore CMS > Sitecore Component Guide >

Info Panel

MSU Tools and Resources

  • A to Z Index
  • Find People
  • Email
  • Tech Support
  • Social Media Directory

Communications Resources

  • University Communications and Marketing
  • University Trademarks and Licensing
  • MSU Brand Studio
  • MSU Editorial Style Guide
  • MSU Photos

Contact us

517-355-7505

Address

Michigan State University 408 West Circle Drive East Lansing, MI 48824

Follow Us

  • Visit our Facebook page
  • Visit our page on X
  • Visit our Instagram page
  • Visit our LinkedIn page
  • Visit our YouTube page
  • Visit our TikTok page

If you're having accessibility issues, please let us know.

Know MoreTransparency Reporting: Budget & Salary/Compensation
  • Contact Information|
  • Site Map|
  • Privacy Statement|
  • Site Accessibility|
  • Call MSU: (517) 355-1855|
  • Visit: msu.edu|
  • Notice of Nondiscrimination|

SPARTANS WILL|© Michigan State University|

Info Panel

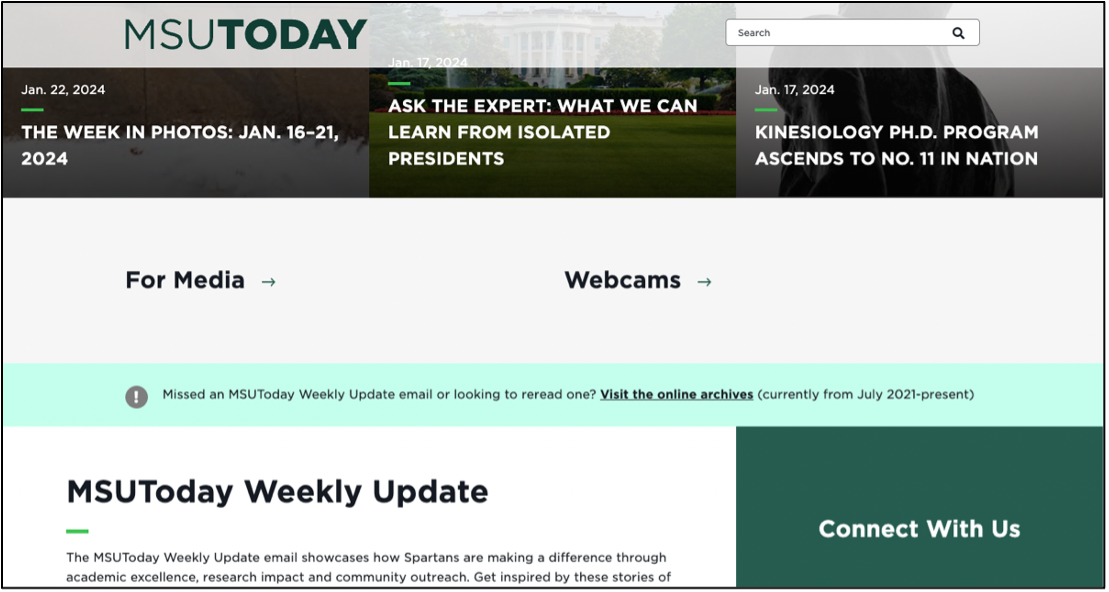
The Info Panel displays a message in a full-width box within a main body content area. The message includes a call to action, or CTA, link to take users to another page.
info-panel-example
Figure 1: Example of an Info Panel component used on MSUToday. The Info Panel is the light green band below the gray Text CTA component. It directs users to visit the archives page of the MSUToday Weekly Update email.

Component Information

  • Usage
  • Best Practices
  • Template Data
  • Related Information

Benefits

  • The Info Panel draws attention to a short announcement message in a light green box with an exclamation point icon.
  • The Info Panel is a full-width component used in the main content area of a page so it complements the grid design of webpages.

Example Use Cases

  • Call attention to upcoming deadlines, such as applications for admission or scholarships.
  • Provide notification of nonemergency announcements with a link to a page for more information.

Component Options and Limitations

  • The Info Panel component can be placed anywhere on a page within the main body content area.
  • There also is a special Info Panel placeholder above the breadcrumb, below the Hero Banner placeholder, to use if the Info Panel should be near the top of the page.
  • The Info Panel component is not intended to display images.
  • The exclamation point icon cannot be removed.
  • The panel color cannot be changed.

Guidelines

  • While the rich text area of the info panel does not have a character limit and could contain more than one link, it is best to keep the message brief and have one clear CTA link.
  • It’s recommended that there be only one info panel on a page to reinforce focus on the CTA link.

Content (multi-line text)

  • Rich text field with limited options for text formatting.

Related Components

  • Alert — The Info Panel resembles a Level 1 Alert.
  • Promo Bar — The Promo Bar has a similar appearance and function to an Info Panel. The Promo Bar can only be placed in a fixed position above the header.

Live Example

  • Demo: Information-Focused Content Components

Instructions for Use

Add an Info Panel to a Page

In Page Builder:

  1. Select the page in the content tree.
  2. Click “+” button in any Placeholder box in the main content area below the Breadcrumb links or the “+” button in the special Info Panel placeholder box above the Breadcrumb.
  3. Select Info Panel component from list.

Alternate method:

  1. Click Components tab at top of content tree.
  2. Locate Info Panel component.
  3. Drag the Info Panel component to any empty placeholder area of the page in the main content area below the Breadcrumb links or the empty Info Panel placeholder.

Tool Use Guide

Documentation updated: June 4, 2026

Is there an issue with this documentation? Report it here.

Assign Data to the Info Panel

If creating a new Info Panel:

  1. Click on + Create new.
  2. Select Info Panel.
  3. Type in the component label, hit enter/return, and click Assign.

If selecting an existing Info Panel:

  1. Locate the appropriate Info Panel in the Page’s Data folder.
  2. Click the panel to select it.
  3. Click on Assign.
Add/Edit Info Panel Content

In Page Builder:

  • Select the Info Panel Content field and type in the desired message. Use the WYSIWYG toolbar to format the text, as needed.
  • Alternative: Click on the component to select it, then click the Content tab in the right side panel. Click to expand the Info Panel section. Click the pencil icon to edit the text. 
Alternate Method: Edit in Content Editor

In Page Builder:

  1. Click the dropdown arrow to the right of the SitecoreAI icon in upper left.
  2. Select Content Editor. It opens in a new browser tab.

In Content Editor:

  1. Locate the Info Panel component in the content tree.
  2. Make necessary changes in each field.
Note: An existing Info Panel can be duplicated in Content Editor and then changed as needed.
  1. Return to Page Builder.
  2. Refresh the screen to see changes.
  3. Preview the page.
  4. Click Actions and Submit to send the page to the publishing workflow.
Examples
info-panel-dpps-example
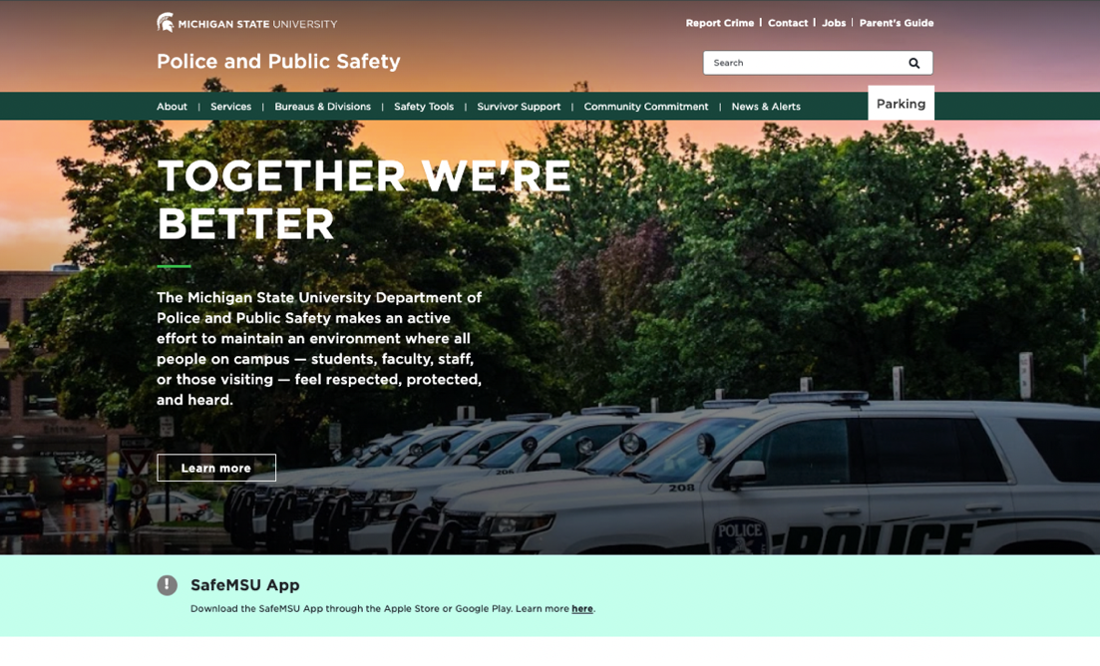
Figure 2: The Info Panel on the Department of Police and Public Safety website, positioned below the Hero Banner in the special Info Panel placeholder.


info-panel-options-example
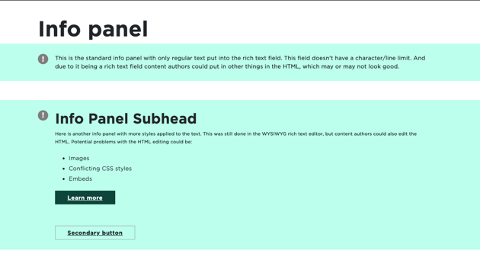
Figures 3 and 4: Different rich text can be added to the Info Panel component, as shown in these two examples.